More than meets the eye....
That's what I think when I see the kids decals at Kids Decal Corner. A little time, a lot of creativity, and you've got more than just an ordinary kids decal.... You've got a one of a kind room!
In Part I of Alphabet Wall Stickers, I will give you a step by step plan on how to make your own wall art using kids decals. Really, you can use this plan with ANY of the smaller kids decals. I just picked this one, cause I love the colors and characters.
Step 1:
Step 1:
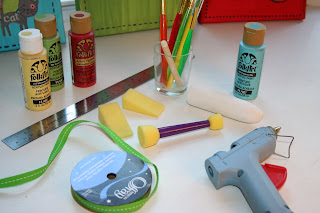
Gather your supplies:
- Canvas. For this project I used 4 cheap art canvas's from Walmart ( $6.00 for 2 ). There are varying sizes, so I recommend taking your kids decals along with you to the store to get a better idea what size will work best with the decal you have. This project I used 8x10.
- Paint. I usually use the Folk Art brand, but mostly go with whatever color best matches your color scheme.
- Brushes and sponges. I like to use regular craft brushes and sponges work great too. If you want to do any special paint detailing you'll need smaller brushes for that.
- Ruler and Chalk for sketching a plan on your canvas before you start putting the finishing details on it.
- Ribbon or Twine for decorating the outside edge of your wall art.
- Paint your canvas. You should paint the edges as well. If you want you could use a coordinating color for the edges. Let the canvas dry completely before applying the kids decals
- A few fun options for a textured background: Try using a sponge to create dark and light spots; try dragging a dry paint brush (like you'd use to paint a wall) through your wet paint - drying your bristles in between till you create the look you like. Have fun and try new things. Remember... You can always paint over something you don't like.... so don't let fear hold you back!!!
- Place your decal on your canvas. It can be centered, it can be off-centered, whatever looks good to you. The best part about this is, you can reposition your kids decals as many times as you want until it meets your satisfaction!
- Decorate the canvas. Its best to use a pencil or chalk to sketch out your plan before you start painting it.
- Some fun options include: Dots, boarders, stripes, scallops.... just for a few examples.
- Dots: the easiest way to create dots is to buy a pre-cut sponge in the size circle/ dot that you want. Again you can find these in the general crafts department of your craft store. You could even try some polka dots as a background before you put the kids decal on it. Try using a lighter or darker shade of the same color of your background paint.
- Stripes: Make them straight, squiggled or different width and colors. I highly recommend using a ruler or small craft level to give yourself a guideline for these stripes ... even squiggly stripes. Its better to have a "straight" squiggle than a crooked one!
- Scallops: The quickest way I know to do these is to use a small round object from around your house, a kids paper cup works great. Trace 1/2 the circle along the edge of your canvas. Continue to repeat this until you've created a scalloped boarder. You could either paint the "inside" edge or "outside" edge of this scallop using a coordinating color to the background.
Decorate the edge with ribbon, jute, twine...
Simply use a glue gun to glue your accessories onto the edge of the canvas. You could also use jewels to decorate the front of the canvas as well.
Ready for the finished product?
Now you can see just how much fun and how easy it is to create your own wall art using kids decals! Let me know how it goes for you. As always... I'd love to see pictures of your own projects and hear any good tips and ideas you have!!
Have fun decorating.... and come visit us next Monday for :
Project - Runway Monday: Alphabet Wall Stickers Part 2


This turned out really great Mel! I can't wait to see what you have in store for us next week. Do you have plans to use every letter of the alphabet?
ReplyDelete