Showing posts with label Mural Stencils. Show all posts

Tuesday, November 2, 2010

Paint Up Your Child's Room with Beautiful Mural Stencils!

flower-fairy-mural stencils

Make your boring white walls say, "WOW"!!
Murals are a BIG trend in room decor right now! A few posts ago, I mentioned the pre-pasted wallpaper decals we offer at Kids Decal Corner, but here is another option for the more adventurous of heart!

Actually, these mural stencils are super simple and easy enough for ANYONE to do, it's just that they'll take more time to complete than the wallpaper decals!

This past week, there have been some cute additions to the mural stencils category at Kids Decal Corner. Take a minute and check them out! They're very imaginative and affordable, especially considering the fact that you can create a FULL room mural!

under-the-sea-theme mural stencil

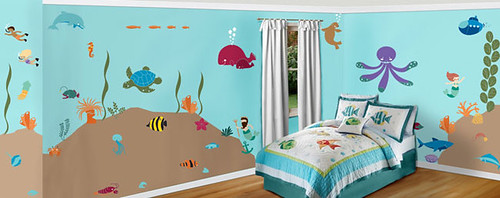
This is our Under the Sea Mural Stencils Kit for $100.00. It includes 45 different self - adhesive stencils that can be used as often as needed to create a one-on-a-kind mural for your little person's bedroom, school room, playroom or even the bathroom!

Each kit comes with free brushes and detailed instructions, including paint color suggestions.

This is a little diagram to show the simple and fun process of how to use these decorative stencils!

Fish Stencil

dinosaur-mural stencils

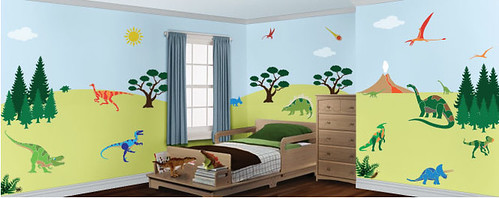
 What little boy wouldn't love to have his bedroom converted to the Jurasic Period?!! All the pre-historic dinosaurs are included in the kit, from T-Rex to the Triceratops! For the full effect, trees, foliage and volcanoes are also included! Our Dinosaurs Mural Stencils Kit is available for $70.00!

Just to put a little bug in your ear...  these decorative stencils would make great Christmas gifts for the dino lovers in your family!

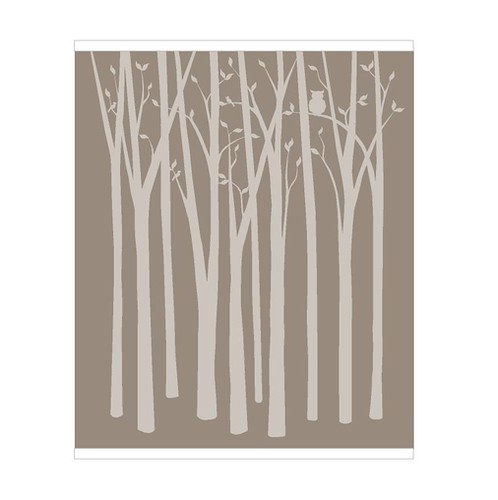
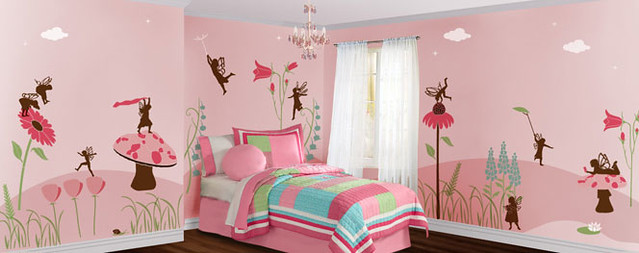
If you're looking for a mural that can be used for boys or girls, how about our NEW Forest Friends Mural Stencils Kit?

forest mural stencil

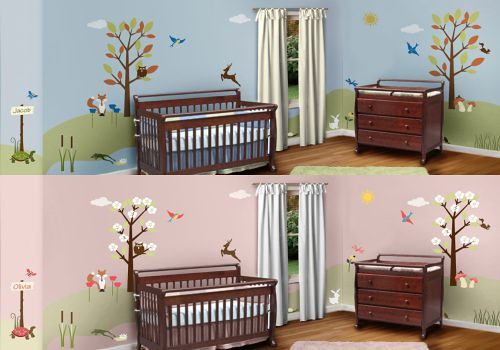
Here you can see how the same mural stencils kit was used to create a gender specific mural, just by changing the paint color options. You could even go with a totally gender neutral colors and that way, no matter boy or girl, they would still love the furry and friendly critters on their walls!

 I also want to take a minute to point out the cute little sign on the turtle's back. You can easily personalize these murals with names, images, or whatever. You can also use the same stencils for walls, and apply them to fabric to make coordinating pillows or throws for the bed or chair. The sky is the limit... let your imagination soar!

I mentioned that these stencil kits take longer to complete than the wallpaper decals, and that's true. But, you might be surprised just how quickly they do go on. Usually, its safe to estimate that it will take the better part of a day or two to create your mural. It's best to have the walls pre-painted a few days before applying the stencils, just so the paint has time to cure.

Well, that's all for now, folks... I'll leave you with a fun little video to show you just how simple it it to create these magical rooms!

Watch short demo

Monday, July 12, 2010

Kids Decals Make A Baby Gift to Remeber!

Hello, Folks! It's Monday already, Wow, time really does fly. In keeping with our Project - Runway Monday, I decided to show you what I've been up to this past weekend. Some very dear friends of ours just had their second child. As a Baby Gift, I wanted to make them a wall plaque with their precious daughter's initials. The plan was to use some kids decals on the project as well, however, my plaque was too small and looking far too crowded for a decal (disappointing, but I didn't feel like starting over).

I hope though, that you can use this idea as a spring board for the next little baby in your life that needs a sweet welcome into the world gift.

So, here is the run down of how I made this little Baby Plaque.

Step 1:  Gather your supplies. You'll need a wooden plaque - purchased at your local craft stores. This particular plaque is 8x10. I think I would go a bit bigger when I do this again.

Primer - Gray or white
Acrylic paint
Brushes
Pencil
Chalk
Paper plate
 
Step 2: Primer your plaque.
I only used gray primer because it was what I had on hand. If the colors you plan to paint your plaque are light, then go with a white primer. If the colors are darker, you'll save yourself time by using a gray primer because you won't need as many coats to get a true color.

Step 3:  Paint the edges of your plaque the background color of your choice. For this project I used green. Let paint dry!

Step 4: Using a round object, trace half circles... creating a scallop edge... around the outside of your plaque. A few tips: roughly measure out your circles, so that you don't run out of room at the end of the plaque. Try different round objects around your house until you find one that works. I used the bottom of the paint bottles and they worked perfectly.

Step 5: Paint your scalloped edge and the center of your plaque. I suggest 2-3 thinner coats of paint. Let the paint dry! This picture was only after 1 coat of paint.

Step 6: Print out the letters and date from your computer. Pick a font that you like and print it out in the size you want. In order to copy it onto your plaque, rub chalk on the back of the printed paper. Now with a ball-point pen, trace over the printed letters and date. When you're done, you'll have a chalk outline on the plaque of the letters and dates to paint over. The great thing about this is, if you don't get your letters or date centered the first try, you can just wipe the chalk off and go for try #2.


Step 7: Paint in your letters and date with a coordinating color. I used a darker pink. Note: If you don't have all the exact colors, you can easily mix colors to create the shade you want. I used a little red to darken up the pink that I used for the background. Use a fine point brush for the lettering! Don't worry, if you mess up, keep some background color handy and you can fix up your mistakes with a little of that paint. 

Step 8: Add special touches. This is where you could add childrens wall stickers or use part of the mural stencils from http://www.kidsdecalcorner.com  to add finishing touches to your plaque. I was planning on using some flower kids decals, but they ended up being too large for my project. I just free handed these flowers and I think they turned out pretty cute. Remember, you can always cut your decals to fit too.


Well, I had lots of fun creating this sweet baby gift for our friends! I'd love to see what you design and create for your next baby gift - or any other gift, for that matter!!

That's all for this week's Project-Runway Monday! Next week.... MOOD BOARD # 2 coming down the runway! Have a great week!

Tuesday, June 29, 2010

Mood Board Creations Using Paint by Number Wall Murals

What are Mood Boards?!! They are an ingenious way of planning the design of a room! It helps to be able to visualize what your room will look like before you actually spend a penny or open a paint can. 

My sister, Christa - who is my dear friend and a DIY Diva herself, thought it would be fun and helpful to you, our followers and customers, to put together Mood Boards that include the childrens wall stickers, mural stencils and paint by number wall murals that are sold at Kids Decal Corner. A fabulous idea, I thought!! 

So, thanks to her great idea, you can expect to see 1-2 mood boards a month coming down the Project Runway on Mondays! Each mood board will feature a decal or stencil and then the suggested decor ideas to go along with it. 

If you're someone who loves beautiful rooms, but gets paralized in the process of decorating because you can't visualize how to coordinate the wall decor with the bedding ... and the paint color ... and the curtains ... and the furniture ... and the rugs ... and the accessories (Sounds overwhelming just typing it all out!) .... then these mood boards are just for you!

Obviously, we are making suggestions in our decor ideas, based on our personal taste and experience in decorating. But our hope is that our ideas act as a spring board for you and your imagination! Feel free to tweak our ideas to fit your room, budget, and taste! These mood boards are meant to be helpful tools to get your creative juices running and give you some, not-so-conventional, ideas of how to use the amazing products we sell at http://www.kidsdecalcorner.com/.

Sooooo.... Without further delay.....

Introducing.... the First Mood Board of Kids Decal Corner!!!


1. This mood boards is designed around the Birch Trees Paint by Number Wall Murals

800-BirchTrees
You can purchase this wall mural at Kids Decal Corner for just $69.95. As well, there are step by step instructions on how to paint this wall mural. Its a simple process of taping, tracing and painting!
We suggest painting this beautiful Birch Tree Mural on one of your four walls - preferably the biggest wall that could become your room's focal point!
2. Paint the mural wall Behr's Winding Path color. We suggest using a Satin or Semi-Gloss finish.
3. We suggest using Behr's Ultra Pure White for the ceilings and trim. Ceiling should be in a flat or satin finish; The trim in a semi-gloss or gloss finish.
4. The rest of the room's walls can be painted in Behr's Desert Plain. As well, use this color, Desert Plain, to paint the trees on your mural wall! 
5. The Rug is from Shades of Light. It is there Soho Dhurrie Rug in the Spa Blue color. If you have wooden floors this rug is a great option. Even if you have carpet, especially if its a light neutral tan or gray, this rug would still really set off the room. Rugs are a great way to visually draw your eye to the focal points of your room. For example, say you are putting your bed against the mural wall... then place your rug beside the bed or halfway under your bed... play around with it until it works for you!
6. Every room needs a little table.... We suggest a French Country Bedside Pedestal Accent Table in End White. 
7. For reclining and reading, try the West Elm Modern Weave Armchair
8. Shades of Light Blue Pendent Light. This would look great hanging in a three-some with the table and chair.
9. If you like to sew, #9 and 10 are suggested fabrics that would make great bed and chair pillows. This fabric is from European Linen in blue. This would also make beautiful curtains. I would suggest simple, long, unlined panels. You could use tabs to attach them to the curtain rod or curtain rings. I think something long and flowing would match the decor of this room best.
10. This fabric is from Waverly Berkley. Its their Striped Pear fabric. It's hard to give you a picture of this idea, but remember you can use a small section of your paint by number wall murals to trace onto the fabric. Use a coordinating dark or light gray fabric paint to create a simple and eloquent pillow that ties in your mural with the rest of your room.
11. For a stylish headboard, try the West Elm Overlapping Squares Twin Headboard. This bed says sophisticated and warm!
12. To tie it all together, DKNY offers a beautiful Oasis Duvet Cover

Hope this Mood Board to helpful! Thank you, Christa, for all your effort to bring us this sophisticated yet warm bedroom!


Wednesday, June 2, 2010

Decorative Stencils for walls and more.

Dots... Dots... and more Dots! 
Polka Dots are the a popular item when it comes to room decor. These decorative stencils are great and very easy to use. Not to mention, the possibilities are endless... so let loose and have some fun! Hopefully these images will start your creative engine. Using these murals stencils is an easy 5 Step process...

As the picture above shows....
  • Peel the self-adhesive stencil from the backing
  • Stick it to the wall (or other surfaces... we'll talk about this later)
  • Using a sponge or stencil brush, Paint in the stencil.... usually 2 thinner coats work better than one heavy coat of paint
  • Remove the stencil as soon as you're done painting
  • Reuse your stencil to keep creating the beautiful look your want.


When you buy the Polka Dot Mural Stencils from www.kidsdecalcorner.com you will receive:
10 self-adhesive polka dot wall stencils (2 of each size)


Its best to come up with a game plan before you start painting. With a piece of chalk you can easily sketch out on your walls where you want your polka dots to go. If you want to change your plan, simply wash off the chalk and start again! Even if you've painted and then change your mind... use your base wall paint and paint over the stenciled dot.


Below is the Fabulous Flower Mural Stencils. This kit comes with: 
16 self-adhesive wall stencils (2 of each flower)


The Fabulous Flowers and Polka Dots are not just stencils for walls.... use them to:
  • Art: Create beautiful wall art or name plaques. Using a plain art canvas or wooden plaque, paint the background a coordinating color... then stencil one or two flowers or dots on top. Overlap them, position it off center or centered, add a name. Talk about fun and PERSONAL!
  • Fabric: Stencil a flower or dot onto Fabric (using matching fabric paint), to create matching pillows for the bed or chair. Try stenciling a row of dots or flowers along the top or bottom of plain curtains to instantly create bring them to life while coordinating them to the rest of the room.
  • Furniture: Try adding a single flower or dot on a dresser drawer or night stand, place the knob right in the center of your flower or dot. Now that would look cool!
  • Chalkboard Areas: Create a place for expressing creativity, by painting a square or oval on the wall with Chalkboard paint. Then use your stencils to create a decorative boarder around it!
  • Accessorize: Want a little sparkle to the walls? Add sparkling jewels to your dots and flower by using a glue gun.
For an even greater look, try combing the Fabulous Flowers and Polka Dots Mural Stencils together! You can buy both at Kids Decal Corner or click above (at the right) to connect to the Mural Stencils products in our store.


All our mural stencils are made by Dream Catcher Kids and come with a suggested list of colors, but obviously you can use whatever colors you like. You can purchase these acrylic stencil paints from any local craft store like Micheals or AC. Moore or Walmart.

Price: it always comes down to the dollar, doesn't it? Honestly, you can't find a better deal out there...
For each mural stencil kit, you pay $24.95... and just think of ALL you can do with these decorative stencils!!


I always LOVE to see your amazing creations... so send me your pictures at info@kidsdecalcorner.com... I can't wait to hear from you! Happy Designing!!